We now describe four exercises:
All exercises require that the cyclist looks at his movement goal, prepares the required movement, and executes it. In all exercises, the cyclist must countersteer to change direction.
1. Riding on a round 8
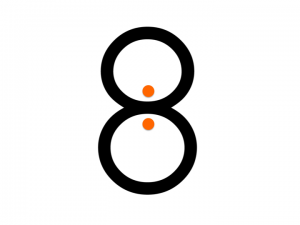
This exercise involves three stages, which repeat themselves. Stage 1 and stage 3 are each other’s mirror image.
- De cyclist rides on a circle (one half of the 8) that is sufficiently small so that the constant countersteering is experienced.
- In the middle of the 8, the cyclist steers from left to right, or vice versa (depending on the riding direction).
- The cyclist rides on the other part of the 8.
To change direction in the middle of the 8, visual information is needed. This visual aspect can be emphasized by marking that place with a gate (two pylons). The corresponding instruction is the following:
- Try to look at the gate as long as possible in advance.
- Prepare for changing the pressure on the handlebars (from left to right, or vice versa).
- Start changing the pressure just before you ride through the gate.
Just as when riding on a circle, proprioceptive feedback is a crucial part of this exercise. This feedback can only be clearly experienced when the cyclist’s hands lie relaxed on the soft handles. Once the hands lie relaxed on the soft handles, the cyclist can move them so that countersteering is more clearly experienced: the inner hand in front of the soft handle and the outer hand behind it. Just before the change of direction in the middle of the 8, the cyclist moves his hands such that countersteering in the other direction can be initiated.
Some cyclists continue to have the impression that they are not countersteering. Do not discuss this, but try to let the cyclist experience the countersteering. This is possible in the same way as was described for riding on a circle. We adapt this instruction to the current exercise here:
- Ask the cyclist to ride circles on one of the two parts of the 8. For now, forget about the change in direction in the middle of the 8.
- Ask the cyclist to ride at a speed that is high enough to be able to lay hands relaxed on the soft handles.
- Ask the cyclist to gradually shift his hands so that he can only turn the handlebars inwards (inside hand behind the soft handle and the outside hand in front of it). The cyclist will experience that, in this way, it is impossible to take a turn.
- Ask the cyclist to steer with the inside hand in front of the soft handle and the outside hand behind it. He will experience that, in this way, he can take the turn.
- When the cyclist experiences countersteering, ask him to change direction in the middle of the 8.
The difficulty of this exercise depends on the diameter of the two circles that make up the 8: the smaller the diameter, the more difficult the exercise. After all, the smaller the diameter, the lower the speed, and the more unstable the bicycle. That is why we always start this exercise with large circles, and systematically reduce their diameter.
Riding on a round 8 is an excellent exercise in planning and executing changing direction. This is due to the clear transition from steering to the left to steering to the right. Riding on a round 8, however, is not representative of riding turns on public roads. On public roads, people usually ride on a straight road section before entering the turn. This means that in the initial situation (the straight road section) both hands can be placed on the soft handles, and that during the transition to the turn the pressure is moved to the inner handle. Such a situation can be practiced on a flat 8.
2. Riding on a flat 8
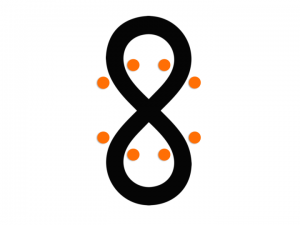
The important difference with riding on a round 8 is that on the flat 8 you first go straight ahead (in the middle part of the flat 8) before you enter the turn. In this segment of the flat 8, both hands lie on the soft handles and the pressure on both is equal. When entering the turn and while turning, the pressure on the inner soft handle is greater. At the end of the turn, there is still more pressure on the inner than the outer soft handle. Because one has to ride straight after the turn, the bicycle has to stand up (come upright position) again. At sufficient speed, the bicycle automatically stands up when one no longer presses on the inner handle.
As with a round 8, changing direction is based on visual information. This visual aspect can be emphasized by marking the positions where a different steering pulse is required with a gate (two pylons).
The difficulty of this exercise depends on the diameter of the turns on the ends of the flat 8:
- The smaller this diameter, the lower the speed, and the more unstable the bicycle.
- The smaller this diameter, the more one has to turn head and (possibly) torso to be able to look through the turn (i.e., to the gate that marks the exit of the turn).
That is why we always begin this exercise with large diameter turns and systematically reduce them.
Riding on a flat 8 can be easily combined with riding straight ahead with a turned head and torso. On the straight segments of the flat 8, instead of taking off the inner hand from the soft handle (as in riding straight ahead with a turned head and torso), the hand is now lying down. However, the pressure on the outer handle is retained to compensate for the rotated torso. When one gets to the gate, the pressure must shift from the outer to the inner handle, so that the turn is initiated.
3. Riding on an oval
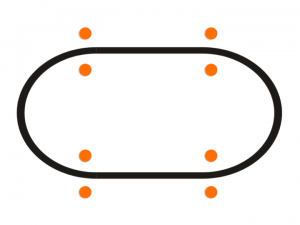
Rijden op een ovaal is een vervolg op het rijden op een platte 8. Rijden op een ovaal benadert nog beter het sturen op de openbare weg. Voor het rijden op een ovaal wordt dezelfde techniek gebruikt als het rijden op een platte 8:
- Op de stukken die je rechtdoor moet rijden, liggen beide handen op de handwatten en is de druk op beiden even groot.
- In de bochten (tussen de twee poortjes die een bocht markeren) is de druk op de binnenhandwat groter.
Om dezelfde reden als bij het rijden op een platte 8, hangt de moeilijkheidsgraad van deze oefening vooral af van de doormeter van de bochten op de uiteinden van de ovaal. Daarom beginnen we deze oefening altijd met bochten met een grote doormeter, en verkleinen deze stelselmatig.
Net zoals bij rijden op de platte 8, is ook rijden op een ovaal is uitstekend te combineren met rechtdoor rijden met gedraaid hoofd en bovenlichaam. De hiermee verworven vaardigheid komt goed van pas als men op een openbare weg wil oversteken en verder rijden in de tegenovergestelde richting.
4. Slalom rijden
], from Wikimedia Commons")
- Op de stukken die men rechtdoor moet rijden, liggen beide handen op de handwatten en is de druk op beiden even groot.
- In de bochten (tijdens het ronden van de pylonen) is de druk op de binnenhandwat groter.
De moeilijkheidsgraad van een slalom hangt af van twee factoren:
- De afstand tussen de pylonen.
- De scherpte van de hoek die men moet maken om van de ene naar de andere pylon te rijden.
We beginnen deze oefening altijd met grote afstanden tussen de pylonen en een flauwe hoek om de pylonen.
De slalom is bij uitstek geschikt voor het oefenen van motorische voorbereiding, en dit is des te meer het geval naarmate de hoeken om de pylonen meer van elkaar verschillen. Concreet, voor het oefenen van motorische voorbereiding, bouw je een slalom met zowel scherpe als flauwe hoeken om de pylonen. De verschillen tussen de hoeken zorgen ervoor dat de fietser niet alleen de volgende pylon moet bekijken, maar ook de daaropvolgende. De fietser moet immers de positie van twee pylonen weten om de scherpte van zijn bocht te kunnen bepalen.
In vergelijking met de platte 8, heeft de slalom het nadeel dat hij een begin- en een eindpunt heeft. Je kunt hem dus niet eindeloos op hetzelfde traject blijven rijden. Omdat juist de herhaling ervoor zorgt dat de vaardigheid toeneemt, is het goed om na het beëindigen van de slalom weer naar het beginpunt te rijden (over een rechte lijn), en de slalom nogmaals te rijden, etc.